Art Directable Rest Shapes
Ziva Tutorials |
Broad Strokes
Art Directable Rest Shapes (zRestShapes Node) enable non-physical tissue manipulation for artistic intent. In simple terms, this means that artist can have direct control over the silhouette and shape of their characters, without having to worry about the dynamics/physical properties. This functionality has a wide range of applications, with direct benefits for both feature animation and VFX artists.
Anatomical Characters: ADRS can be used to rapidly achieve the most complex and challenging issue shapes instantly, opening the door to better and faster digidoubles, emotive animals, and facial simulations. Below, you can see the shoulder of Mr. Ink hitting specific shapes throughout a single sequence. By using ADRS, the artist can achieve the most accurate, preferred muscle shape without having to rigorously rig the muscles achieve such deformations. Similarly, this could be used to achieve more unusual or exaggerated muscle firing in choice frames, all while maintaining the natural excitation, attachment, and material settings.
Feature Animation: Often, cartoon characters must abide by a realistic yet entirely make believe set of world rules. These rules often do not follow the physical boundaries of real life. With ADRS, those unique goal silhouettes can be embedded into the actual simulation and setup effortlessly. Beow, you can see the Jellyphant deforming naturally to hit the target shapes on either side. The dynamics are constant, consistent, and robust, while the shape is completely novel and controllable.

Additionally, live shape alterations can take place, where target geometry alterations and immediately reflected on the applied Rest Shape. There is no limit on the number of target shapes applicable to a single simulation at one time.
How to Set Up a Rest Shape:
- Duplicate the Jellyphant Tissue mesh and call it back_spikes.
- Sculpt your changes on the sculpt mesh, in this example back_spikes. Do not change any topology.
- Select your original Tissue mesh in this case jellyphant_tissue.
- Shift select the scuplted target, in this case back_spikes.
- Choose Ziva ➞ Add Tissue Property ➞ Rest Shape.
If you play the simulation now, you’ll see that by default, the Rest Shape is activated to full effect on the first frame of simulation.
How to Extract a Rest Shape for Smoother Transition:
If you are creating rest shapes for a rig, you’ll want to extract the correct mesh to feed in as a Rest Shape target.
- On the solver start frame, duplicate the Tissue you’d like to extract a rest shape for.
- Simulate the character into a pose that you wish to create a Rest Shape for.
- Duplicate the Tissue you wish to create a Rest Shape for at the current frame.
- Sculpt this duplicated mesh into the shape you would like to see at this pose.
- Be sure that your timeline is still at the frame where you duplicated the Tissue to do the sculpting.
- Then, select the neutral shape, the Tissue after simulation, and the sculpted shape
- Type the following into the MEL command box: zRestShape -pullBackGeo
- You will get a new mesh with the suffix “_restShapeCorrective”. Select this mesh, then select your Tissue
- Choose Ziva -> Add Tissue Property -> Rest Shape.
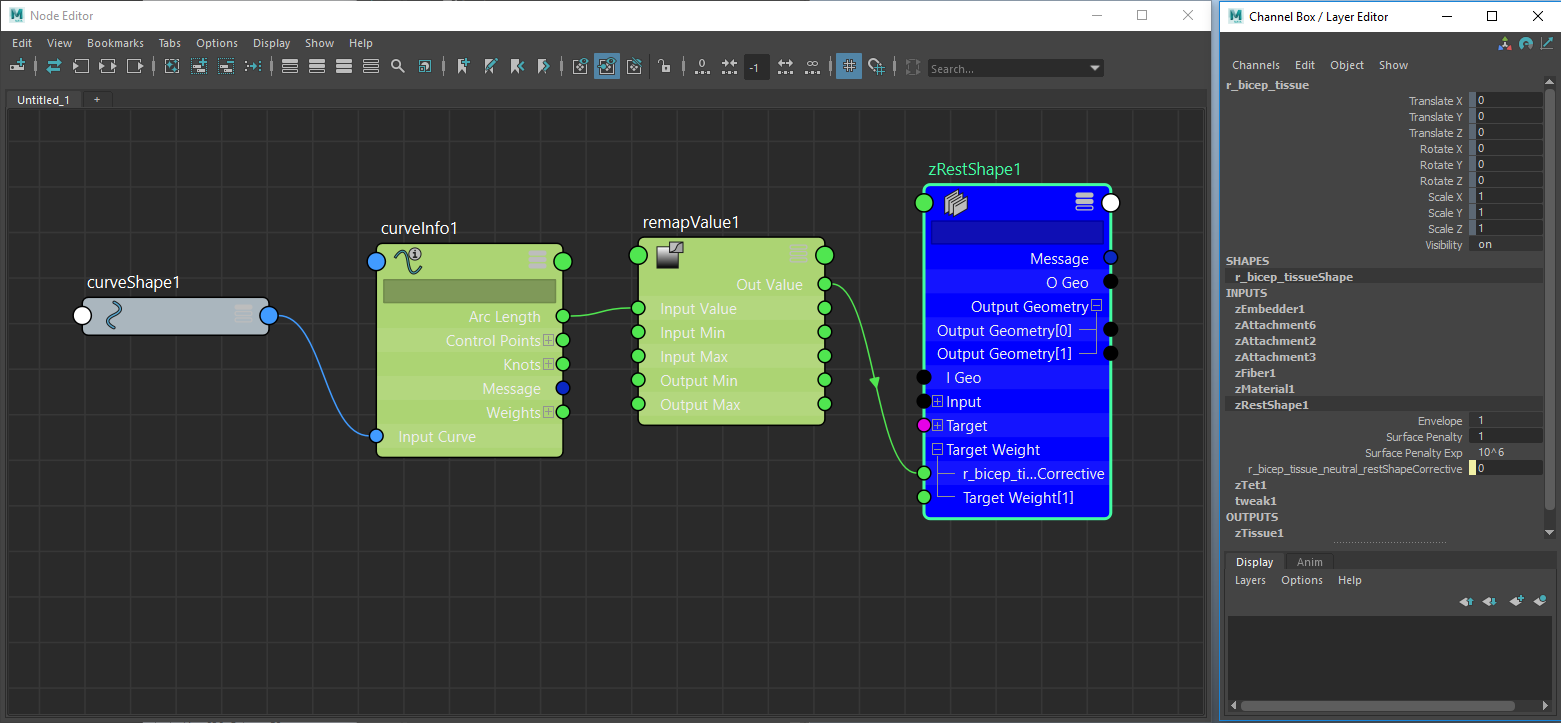
- Select your Tissue mesh and roll out the node zRestShape1 in the channel box.
- You can keyframe or connect other nodes to the target weight in the zRestShape1 node. In this example the curve from the line of action is used in conjunction with some standard Maya nodes to drive the target weight.
Below: An example node setup to drive the Rest Shape target:
Get notified about new Ziva Tutorials:

Does anyone know if you can have your muscle sim geometry influenced by blend shapes (like correctives / psd driven shapes) for muscle shapes that are difficult to completely sim into shape? ....Like a goal influence where it is still controlled by the sim but trying to reach the target shapes. If so, Can you also paint the influence area weights?
Hey guys, So I was wondering - Can I create a blend shape - so a Poly that morphs from one shape to another while using the Z-tissue physics. Essentially I have a Square that changes shape to a ball while falling down past a bunch of Z-tissue / Z-cloth objects. I want my object to interact while it's morphing. What's the best way to go about that / am I approaching this wrong? Thanks in advance.